Getting Started
Important Notes Before Getting Started
Important Note
If you are using Mirror you should not open UNET demo scenes after you have imported Mirror.
If you are using UNET you should not open the Mirror demo scenes. Doing either of these can corrupt the scene and make swapping more difficult later.
Purpose
This document outlines how to navigate the Demo - which simulates an empty project with some sample scripts to get you started with authentication. This document will also cover how to set up a new project. For how to integrate with an existing project, see the Integration Guide.
Authentication is important to tie a single user to a name and enables functionality such as Friends, Guilds, Retaining Channels across sessions, and the demo will provide automatic name binding. If none of these features are required for your use cases and you do not require World Space Chat Bubbles, this may be a more complex asset than you need and I advise evaluating whether or not my significantly cheaper and less complex chat system would be more suited for your needs. Check out the Chat System Comparison Here
Disclaimer
The create account / login functionality is provided as a demo only and is not production ready. Passwords are not encrypted, and very little validation is done on login & create account which leave it open with security vulnerabilities.
The purpose of this asset is the Chat & Social functionality, not to provide a robust authentication platform.
UNET was deprecated in Unity 2018 so you will get many warnings about using the UNET classes /HLAPI features in 2018. If you would like to remove these warnings you can use Mirror to get identical features without the warnings.
Actually Getting Started
Scene Requirements
Chat System
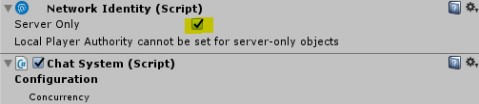
Must be on the first scene you would like players to be able to chat on. Any subsequent scenes should not have a ChatSystem in them. This object should be marked as Server Only on the NetworkIdentity. Recommended that this is the only script on this GameObject.
Chat Panel
Should be in the scene on a Canvas. If you would like to retain chat messages across scenes, ensure to checkmark that configuration option.
If you choose to do this, ensure ChatPanel and any other UI features you would like to persist across scenes are the only GameObjects in that Canvas. You cannot mark a single object within a Canvas as DontDestroyOnLoad so we must mark the entire Canvas as DontDestroyOnLoad. Additionally, the Canvas should be at the root level of the scene. Like the ChatSystem GameObject, this should only be present on the first scene you would like players to be able to chat on. It will be retained as the active scene changes.
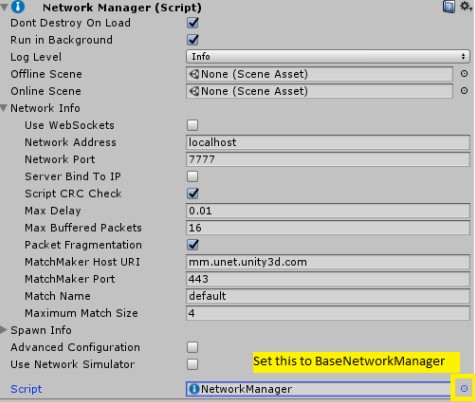
NetworkManager
In Llama Chat, we are utilizing both the HLAPI and LLAPI. Some functionality is present within NetworkManager that we needed to extend. Specifically – the OnServerDisconnect method. If you have some solution other than using a NetworkManager please look at BaseNetworkManager and ensure you do the same on player disconnect.
If you are using a NetworkManager, ensure you either set your NetworkManager class to BaseNetworkManager, extend NetworkManager, or integrate the code within BaseNetworkManager into your custom NetworkManager.
Configuring Llama Chat
Regardless of if you are integrating with an existing project or a new project you will still need the ChatSystem object in your scene. A preconfigured ChatSystem Prefab is located Assets/Llama Software/Llama Chat/Prefabs/Llama Chat.
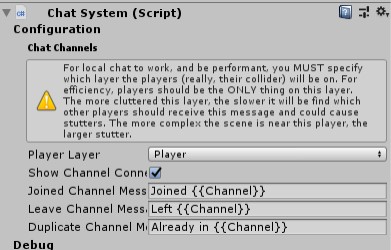
Chat Channels Configuration
In this section you can modify the following properties:
- Player Layer
- For local chat to work, and be performant, you MUST specify which layer the players (really, just their collider) will be on. For efficiency, players should be the ONLY thing on this layer. The more cluttered this layer, the slower it will be find which other layers should receive this message and could cause stutters. The more complex the scene is near this player, the larger stutter.
- Show Channel Connection Messages
- If you would like to show messages like "Joined Guild" "Left Guild" in response to a player joining/leaving a channel.
- Joined Channel Message / Leave Channel Message
- Message format to send these messages on. These should not be blank if you have enabled Show Channel Connection Messages
- Duplicate Channel Message
- Message to send if a player tries to subscribe to a channel they're already subscribed to. Leave blank to not send this message.
Player_Chat Configuration
Regardless of whether you are integrating with an existing project or starting from scratch, Player_Chat should be added to your Player prefab. On player creation it will request from the server this player's channel subscriptions, friends, and blocked players. You can extend what is requested in the SetupInitialSubscriptions method. It is expected that the Server sets the Player_Chat.Name when spawning the object. This is handled in the LlamaSoftware.Chat.Demo.LoginController for the demo.
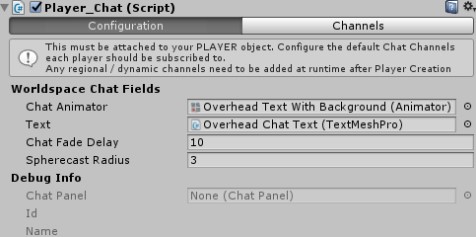
Configuration Tab properties:
- Chat Animator
- The animator to Fade In/Out the Worldspace chat bubble. The Runtime Animator Controller should have at least 2
triggersif you do not use the Animator in the demo:ChatSystemConstants.FADE_INandChatSystemConstants.FADE_OUT.
- The animator to Fade In/Out the Worldspace chat bubble. The Runtime Animator Controller should have at least 2
- Text
- The TextMeshPro text object to render the chat message inside of.
- Chat Fade Delay
- How long (in seconds) the Worldspace Chat bubbles should be visible before fading.
- Spherecast Radius
- When receiving a
ChatType.LOCALchat message a Vector3 is sent. This is the error distance from thatVector3the client will check to try to find the player. If it's too low, potentially the player sending the message has moved far enough away from that location and we won't find the player. If it's set too high, it can potentially have negative performance impact.
- When receiving a
 Channel Tab properties:
Default Chat Channels are channels that all players should automatically be subscribed to on spawn. If a player becomes unsubscribed from one of these channels they will not automatically be added back since the currently subscribed channels are stored in the database.
Channel Tab properties:
Default Chat Channels are channels that all players should automatically be subscribed to on spawn. If a player becomes unsubscribed from one of these channels they will not automatically be added back since the currently subscribed channels are stored in the database.
- Channel Name
- The name to display on the UI for this channel.
- Network Channel
- This must be globally unique. Each chat channel is uniquely identified by this and this is how we determine if a player is subscribed to a chat channel or not.
- Color
- The color the text should be displayed in when rendering chat messages.
- Type
Globalwill send to all players subscribed to this chat channel regardless of where they are.Localwill send only to players who are within the specified radius of the sending player.
How to use Llama Chat in a simple empty Project
There is a video tutorial on this here:
Prerequisites
Ensure TextMeshPro is in your project already. If it is not, you can go to the Package Manager and download install it.
If you are not on Windows 64bit platform, you may need to download the appropriate version of SQLite tools for your operating system here Based on your target platform(s), you may also need to download the sqlite dll/so/whatever for those.
Setup
Note that the asset comes with a sample database already constructed. You can view the sample.
- Import the Llama Chat package
- Ensure
demo-loginis added to the build configuration (open demo-login > CTRL+SHIFT+B > Add Open Scene) - Run the
demo-loginscene and create an account. This account will only be stored on the machine running the demo.
Important Scene Setup Notes
Please note the section General Scene Requirements. Nothing more to note on top of that.
How to use Llama Chat with a Lobby setup
Prerequisites
Ensure TextMeshPro is in your project already. If it is not, you can go to the Package Manager and download install it.
If you are not on Windows 64bit platform, you may need to download the appropriate version of SQLite tools for your operating system here Based on your target platform(s), you may also need to download the sqlite dll/so/whatever for those.
Setup
Note that the asset comes with a sample database already constructed. You can view the sample
- Import the Llama Chat package
- Ensure
LobbyandLobby-gameare added (in that order) to the build configuration. (Openlobby> CTRL+SHIFT+B > Add open Scene, repeat forlobby-game) - Build Llama Chat so you can connect client(s)
- Run the Lobby scene and create an account. This account will only be stored on the machine running the demo.
- Connect as many clients as you would like. Whoever is the host will be able to click Start toenter the game. Any other clients will be able to chat and wait for the game to start.
Important Scene Notes
This scene combines the "Lobby" and "Login" functionality to keep it simpler. In your game you will likely want to split the functionality into separate steps where logging in provides a UI to join some lobby, do some magic to find an appropriate match, and only then enter the lobby.
Notice that this scene demonstrates the DontDestroyOnLoad instructions specified in the General Scene Requirements.
In this scene, no default chat channels are defined, and all chat channels are provided as AreaTriggeredChannelJoiners.
This scene also extends the BaseNetworkManager (into LobbyNetworkManager) to correctly manage player creation.